Introduction to Cataloger’s Desktop/Classification Plus
|
Table
of Contents |
|
1. Startup |
|
4. Searching (using search templates) |
|
a. LCSH |
|
5. Shadow Files |
|
b. Bookmarks |
|
c. Notes |
- Double click the Cataloger’s Desktop icon.
- The Opening Screen consists of several options. Select “Click here for Infobase List” for the most comprehensive listing of the resources.
- There is also a new option for “Infobases Listed by Topic”, which may be of use to some users according to preference.
- Some links are “Web only” and will activate the web browser and take the user to the Web resource. The other links reside at the application on the server/PC.
- Single clicking on a resource will open a resource (when the cursor is placed over an active link, it changes into a hand).
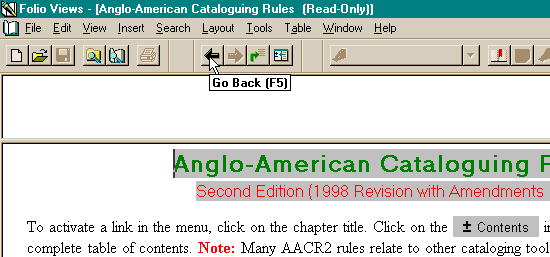
- To return to a previous screen, the back button (or f5) on the toolbar (near the top of the screen) can be utilized (image 1). Likewise, the forward button (or Shift-f5) will return the user to the selected document.
Image 1
_____________________________________________________________________
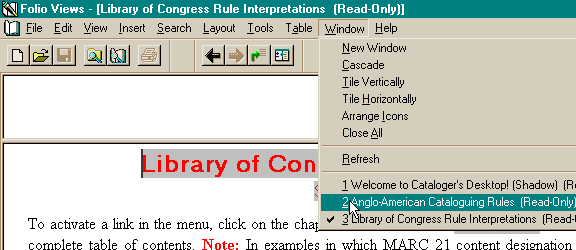
- On the file menu, the selection “Window” will allow navigation to the welcome screen and any other open resources (image 2), and Ctrl-tab toggles between open resources.
Image 2
________________________________________________________________________
- When
the user selects a separate list of infobases (also called a “Master List
of Tools”) such as “Library of Congress Classification Schedules” or
“CONSER Documentation”, this separate list appears to becomes the base
(“Welcome”) page from which the user is working. The user can navigate
between open resources and the original welcome/base screen via the back
and forwards buttons
 at the top of the screen on the
toolbar, or go to the bottom of the page and click the gray button:
at the top of the screen on the
toolbar, or go to the bottom of the page and click the gray button: 
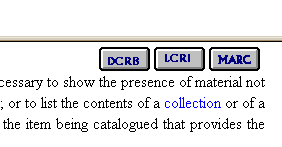
- Many infobases link to other infobases if they refer to a relevant rule, code, or other information source in another document. For example, AACR2 and LCRI have many reciprocal links at rules that occur in both documents (Image 3b).
In AACR2, at this particular
rule, there are links to three documents:
___________________________________
Highlighted blue text links can be either internal or external links. There are also highlighted green text links which link to popup notes.
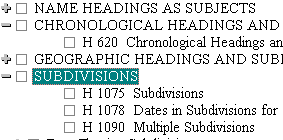
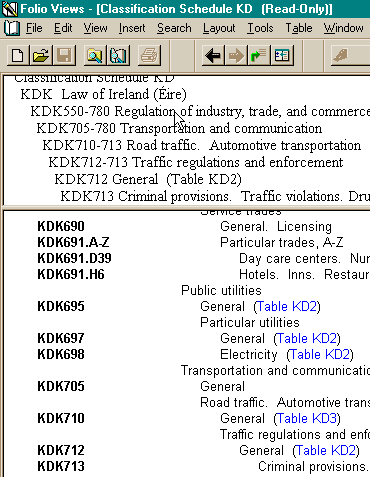
- Contents view: After opening an infobase such as “Subject cataloging manual: subject headings” (SCM:SH) (example used in image 3), select the “Contents” tab near the bottom of the page to view an expandable table of contents. Each heading with a “+” can be expanded by single clicking. Clicking the “-“ contracts the heading. Double clicking on a contents entry (i.e., the words themselves) brings the user to the point in the document indicated by the contents. (image 3). Also, by typing numeral keys, the table of contents will expand or contract according to the numeral selected. For example, if the user types the number “3”, the contents will expand (or contract, depending at what level the user has already expanded the contents) to the third hierarchical level of the contents.
Image 3_____________________________
- The boxes to the left of the contents entries can be checked in order to limit a subsequent search to those “checked” branches (see 5, Searching).
- Document/Browse views: The default view of a resource is the Document view. The Browse view tab combines the Contents view with the Document view. Document or Browse views may be selected at any time by clicking the appropriate tab near the bottom of the screen.
- The Reference window (window towards the top of the infobase which usually displays a hierarchy of the present location) can be resized by dragging the border. Also, any part of the hierarchy levels in the Reference window can be double clicked in order to go to that part of the document. (image 3a.)
Image 3a
_______________________________________________
Availability and form of searching templates vary in Cataloger’s Desktop/Classification Plus, depending upon the infobase being searched.
The templates are accessed via the
“binocular” buttons ![]() at the lower left-hand corner of the screen,
or via “Search” on the file menu. Searches not available in a given infobase
will be grayed-out.
at the lower left-hand corner of the screen,
or via “Search” on the file menu. Searches not available in a given infobase
will be grayed-out.
Most infobase search templates offer the “Checked branches” option, which limits the search to branches/sections “checked” by the user in the Contents view (see 3a., Contents view). To clear “checked branches”, on the file menu go to “View” and then select “Clear All Checks”. “Apply to all” can be selected to search all open infobases.
After completing any search, the
“Hit List” view tab can be selected to display a more easily navigable view of
the search “hits” from various parts of the documents (see images 5b, 5d). Also, the forward and
backward buttons ![]() at the bottom-center of the screen, allow
the user to move forwards and backwards between highlighted search hits in
document view, and the pull-down window to the left of these buttons saves
previous searches.
at the bottom-center of the screen, allow
the user to move forwards and backwards between highlighted search hits in
document view, and the pull-down window to the left of these buttons saves
previous searches.
To clear current search results, the user can select the button with crossed-out binoculars or “Clear Query” in “Search” on the file menu. Also, subsequent searches clear previous search results. Search templates will retain the last search query, unless the “Previous query in query dialog” option is deselected in the Tools, Options file menu on the Query tab. “P” and “N” (or “Prev” and “Next”) buttons on most query templates, which move the searcher back and forth between “previous” and “next” searches, will still function if this option is deselected.
- LCSH: Searching LCSH may be useful for locating an appropriate established subject heading, although it is not as up-to-date as the LCAF on OCLC. Also, established subject headings often list the subject portion of the corresponding Library of Congress Classification numbers, many of which are linked directly to the classification schedules. (Note: LCSH is a large document; thus, searching using the templates may be slow depending on the power/memory of a given computer.)
i. Query template: This template does simple keyword and natural language relevance searches. It searches every word in the infobase, including scope notes, etc. It truncates automatically and searches similar words. Some syntax (see Appendix) can be used, such as quotations to indicate a phrase (e.g., “nineteenth century” will search for “nineteenth century” and “nineteenth centuries”)
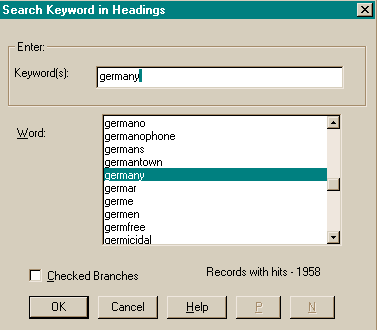
ii. Query template 1: Search keyword in headings. This template limits the search to keywords in headings (the headings listed alphabetically in the infobase--authorized/established or unauthorized terms) and is useful if it is not certain what the correct form of a heading may be (image 4). This does not include subdivisions.
Image 4
iii. Query template 2: Search subject headings and subdivisions. This template is useful for a more refined search, as it can be limited to a particular heading and a keyword from a subdivision it may have. It will search the subdivision at any level of hierarchy (Images 5-5a).
IMPORTANT: Some established headings will be listed in the large “Heading” window with the phrase “may subd geog” (may subdivide geographically) as part of the heading. In order to successfully search on these terms and their subdivisions, the user must ensure that this established heading has been selected in the “Complete Heading” window. (Note: LCSH does not contain every possible heading/subdivision combination.)
Image 5
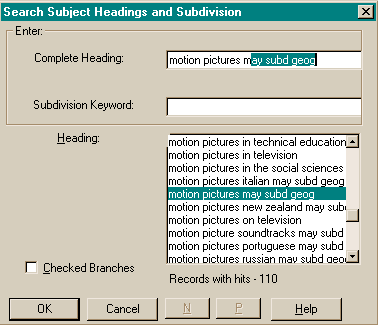
Image 5a
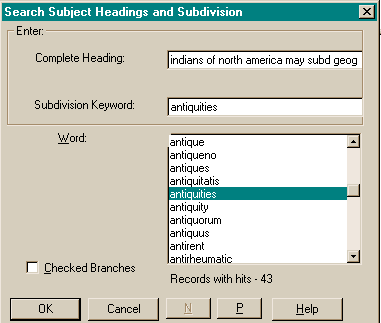
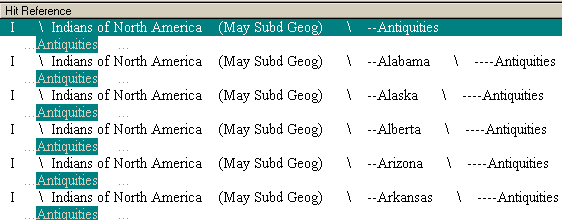
Image 5b. (Partial Hit List of search results from image 5a) This example shows that when searching on “Complete Heading” and “Subdivision”, the subdivision can occur in the 2nd, 3rd, etc., position. Here it appears in the 3rd position in the subject heading.
_______________________________________________________
iv. Advanced query: The advanced query template is the same for all infobases and can use a complex syntax (see Appendix for syntax table) to limit searching to headings at particular levels of hierarchy, notes, highlighted text, etc. In addition, a simple, free-text search can be performed that will search all text in a given infobase. (Images 5c-d), which is similar to the standard query, except that the advanced query template displays hits before it is executed.
See Images 5e, I-III for an example of an advanced query using the syntax and searching for a subdivision in LCSH.
Searching for a heading and subdivision in LCSH can be accomplished in this way using the limiting syntax, but it is more quickly and efficiently accomplished by using Template 2 (see 5a, iii and images 5-5a above).
Image 5c (Advanced query simple free-text search)
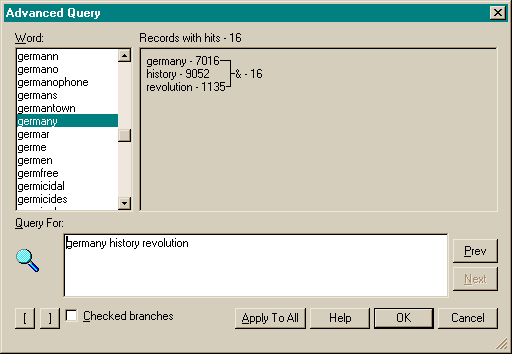
Image 5d (Partial Hit List for search in 5c)

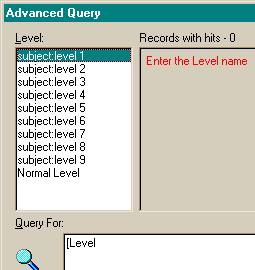
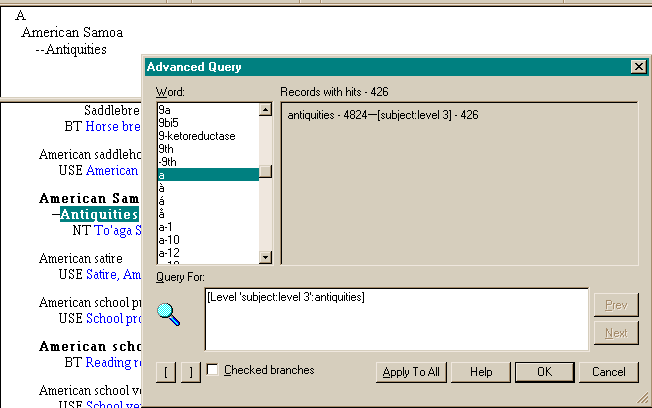
Images 5e (I-III)-Advanced search query using syntax: In these examples, the search is limited to the third level of hierarchy in the LCSH. Such a search is constructed in the Advanced Search Template by beginning the search with a left bracket “[“. The user is prompted for a “Scope” or limiting term for the search such as “Level”, “Field”, “Headings”, etc.
I. In the example, “Level” is chosen (“Headings” could be alternatively selected and provides a similar search in LCSH), after which the user is prompted to selected a “Level name”: in this case, “subject:level”.
II. “Subject:level 3” is chosen and the user is prompted for the searched for heading, in this case, the subdivision “Antiquities”, which is added after the colon.
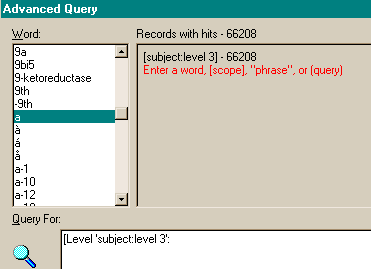
III. In the reference window, it can be seen that “Antiquities” is the third level, after the letter and the main heading. This search has searched the entire LCSH and shown which headings are subdivided by “Antiquities” at the third level, which is the level at which “Antiquities” is often used as a subdivision after a place or an ethnic group.
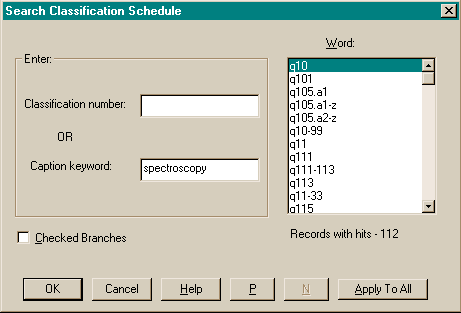
Template 1 offers the opportunity to search a known call number, known call number range, or by caption key words and words in the index (Image 5f, I-II).
Image 5f, I: the call number must match an item in the
“Word:” window. 
Image 5f, II: this search will present the user with a selection of places in the Q schedule where different types of spectroscopy are classified. Some of the query syntax can be used in the keyword searches (see Appendix) such as quotation marks around phrases, etc.
Query Template 1 allows the searcher to limit his/her search to a section of the manual.
Image 5g, I: This search is limited to the broad instruction category: “Geographic Headings and Subdivisions” and searches for the keyword “rivers” wherever it occurs within that category. This might be a search which would be useful for finding out how to set up a subject heading for rivers. Searches can also be limited to specific instruction sheets in the manual and to general topics such as “subdivisions”, but normally it would not be desirable to limit using more than one factor per search.
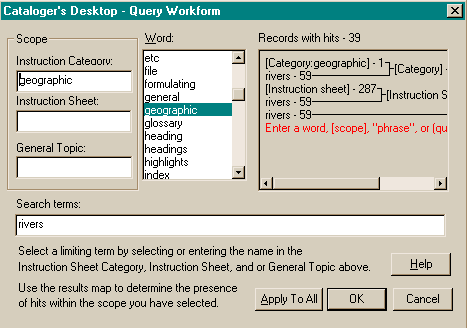
Image 5g, II: Query Template 2: This query is automatically limited to keywords in the subdivisions section of SCM:SH.
i. Template 1 is useful for limiting a search term to one of the following:
A. A particular chapter number or word from the chapter title.
B. An “area” in AACR2/LCRI such as “series” (or 1.6), “title” (or 1.1, 2.1, etc.), or “notes” (or 1.7, 2.7, etc.), etc.
C. A general topic, such as “computer file”.
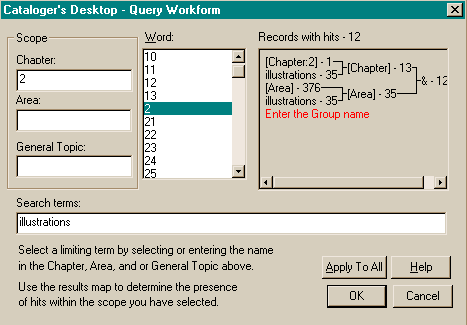
Image 5h. Template 1: search for how illustrations are treated in Chapter 2 for Books, pamphlets, and printed sheets.
ii. Template 2 is useful for searching one of the following:
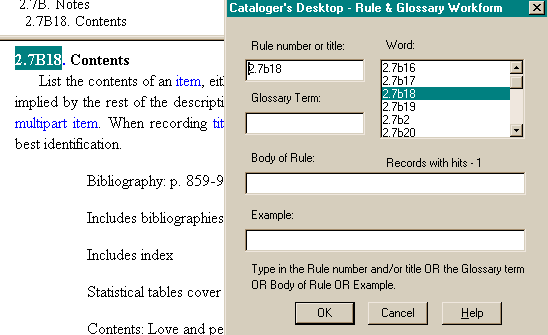
A. Rule number or name (e.g., 2.7b18 or “contents”)
B. Glossary term (“edition”, “fascicle”, etc.)
C. Body of rule (searching a keyword somewhere in the body of the rules.
D. Example (Searching a keyword in the examples given throughout AACR2/LCRI).
_Image 5g: Searching for a specific rule in Template 2 in AACR2 _______________
_____________________________________________________________________
One of the most useful tools in
Cataloger’s Desktop is the ability to create shadow files, which can then be
customized by adding notes, bookmarks, links, highlighting, etc. (Note: any
time a change is made a shadow file, the file must be saved either by confirming
the save upon exiting the infobase or clicking the save file button ![]() on the toolbar).
on the toolbar).
i. Open an infobase you wish to customize, such as AACR2. Notice at the top of the screen on the title band that it reads: [Anglo-American Cataloguing Rules (Read-Only)].
ii. While viewing this infobase, on the upper toolbar click the button displaying the blank, white sheet of paper (or go to file menu, “File”, and select “New”).
iii. In the dialog box that appears, in the “File name” window assign the new file an identifiable, recognizable file name (e.g., in this case AACR2; for the Subject Cataloging Manual: Subject Headings it could be SCMSH, etc.).
iv. Click on the “New” button at the right (above the “Cancel” button). Now you should be looking at a new Shadow file, which can be customized, and at the top of the screen on the title band it should read: [Anglo-American Cataloguing Rules (Shadow)].
v. At this point, you can return to the “Read-Only” file and close it.
i. When you are at a place in a shadow file infobase where you would like to create a bookmark, place the cursor at the exact point where you would like the bookmark to be.
ii.
Click on the bookmark icon on the tool bar at the top right ![]() (or go to “Tools” on the file menu, and then
select “Bookmark…”; or use “Ctrl-m”).
(or go to “Tools” on the file menu, and then
select “Bookmark…”; or use “Ctrl-m”).
iii. In the Bookmark dialog box which appears, in the “Name” window where a highlighted “Bookmark 1” appears, type in an identifiable name for the bookmark (Image 5h). In naming the bookmark, keep in mind that you may eventually have many bookmarks, thus they will need to be alphabetized or numerically ordered in a useful and easily navigable manner. Also, in this box, there are options to move, delete or rename a bookmark. (Note: bookmarks cannot be activated from the Contents or Hit List views.)
Image 5h
iv.
When the shadow file infobase is closed, the user is prompted
to save the file, or, the file can be immediately saved by clicking on the save
button ![]() at the upper left of the toolbar.
at the upper left of the toolbar.
i. When you are at a place in the “shadow file” infobase, where you would like to create a note/annotation, place the cursor exactly where you would like the note to appear.
ii.
Click on the note icon on the toolbar ![]() (or go to “Tools”, and select “Note” on the
file menu; or use “Ctrl-n”).
(or go to “Tools”, and select “Note” on the
file menu; or use “Ctrl-n”).
iii. In the pop-up note box, type in the text of the note and close the box. At this point you will be prompted to save the note. Click “Yes” if you want to save it. The note will appear as a small yellow square with the corner turned up, as in the toolbar icon.
iv. To delete a note, place the cursor at the note (just in front of the image) and select “Tools” and “Remove Note” on the file menu (or “Ctrl-shift-n”).
- Creating Links Between infobases: At present links can only be created from notes (see 6c. Creating Notes, above). Also, when creating a link between infobases, both infobases must be shadow files. In this example, a link is being made from SCM: SH to AACR2.
i.
From the note box, highlight the text from which you wish to
Link 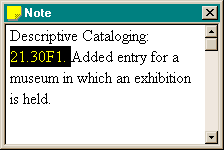
ii.
Right click on the still-highlighted text, and highlight
“Link” from the menu: 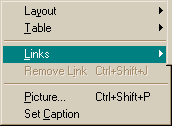
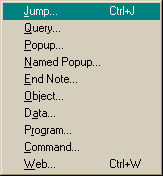
iii. Then select “Jump…” from the type of link menu:
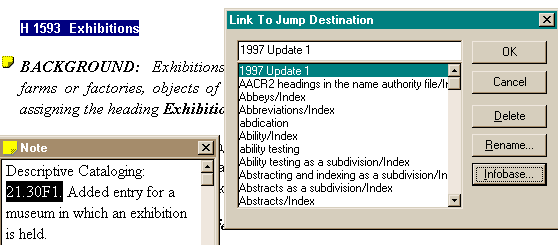
iv. In the “Link to Jump Destination” dialog box, select “Infobase…” (Image 5i)
Image 5i_______________________________________________________________
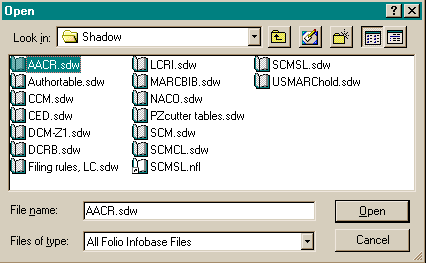
v. In the “Open” dialog box which appears, select the infobase (shadow file) to which you wish to make the jump link. In this example “AACR.sdw” is selected (Image 5j).
Image 5j
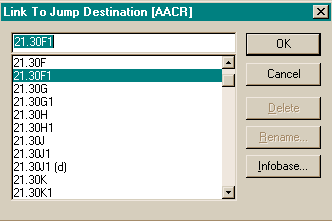
vi. In the “Link to Jump Destination [AACR]” box (Image 5k), select the rule or keyword/heading to which you wish to link. In this case it is Rule 21.30F1. Click “OK”. When you close the popup box, you will be asked if you want to save the changes you made to the popup box. Click “Yes” to save the link.
Image 5k
i. Create a note as in 6 c.
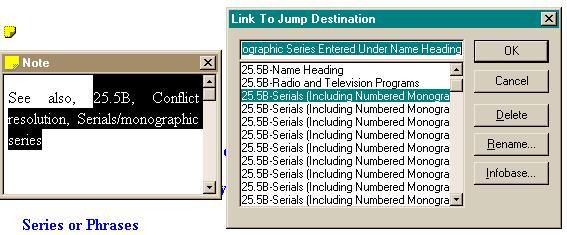
ii. Repeat steps for creating a link from 6 d, i-iii (do not select the “Infobase” button on the “Link to Jump Destination” box).
iii. In the “Link to Jump Destination” dialog box, select the rule/heading you wish to link to (Image 5L).
Image 5L.____________________________________________________________
i. Using the mouse or keys, highlight/select the text you wish to highlight.
ii.
Click the highlight button ![]() on the toolbar (or go to “Tools” and “Highlighter” on the toolbar; or Ctrl-h)
on the toolbar (or go to “Tools” and “Highlighter” on the toolbar; or Ctrl-h)
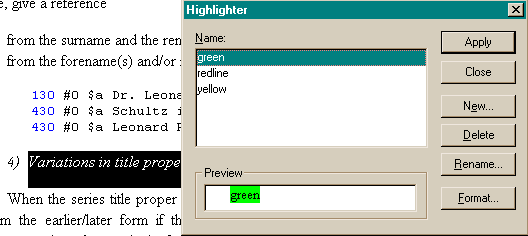
iii. In the “Highlighter” box (Image 5m.), select the color for the highlight and click “Apply”. (Note: using the “New” botton can create other colors for highlighting).
iv. Alternately, a color can be selected from the highlighter bar/pull-down menu on the toolbar at the top of the screen.
a. While the bar is selected/depressed, clicking and dragging will highlight the selected text. Releasing the bar will discontinue automatic highlighting function.
Image 5m._________________________________________________________
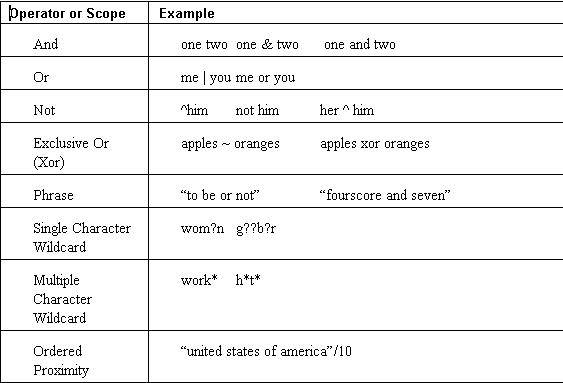
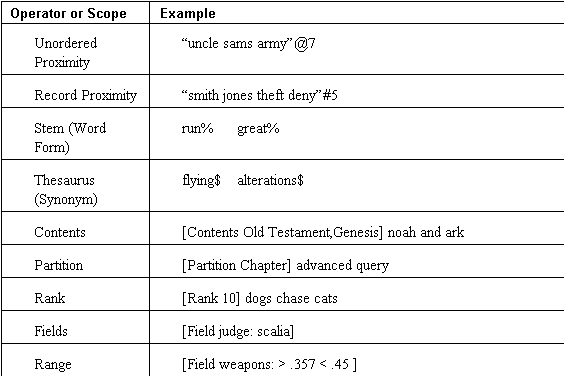
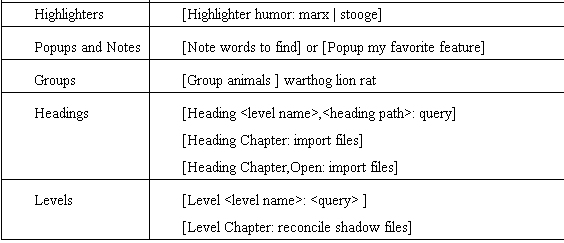
Advanced Query Syntax
Return to:
Table of Contents/Top of Page Local Documentation Cataloging Resources Cataloging Department